Access and Environment#
SSH Login#
The Secure Shell (SSH) protocol is used to access nodes on Levante. SSH client programs are available for all major operating systems. To access one of the Levante login nodes you can use the following command:
ssh -X <userid>@levante.dkrz.de
in which <userid> must be replaced by your individual user account.
Levante host key fingerprints#
When you first connect to Levante, your ssh client will not be able to establish the login node’s authenticity. Any of the following fingerprints is valid for Levante.:
SHA256:aQ3r9kNwIr/RhcxeMGenVClKLY1IWxj574VmroAoJQs
SHA256:r95ZOIATUgcJJYCVRPDp4irsQzr1z7IlRN8UgU8i1vk
SHA256:imUcg+ZIP/N5046nfe10zj66dJlPe2wZXxDEdOviCd4
After having logged into Levante, you will find yourself on one of login nodes: levante[0-6]. The login nodes serve as an interface to the compute nodes of the HPC cluster. They are intended for file editing and compilation of source code, as well as for submission, monitoring and canceling of batch jobs. They can also be used for simple and not time nor memory intensive serial processing tasks.
Not more than 10% of a login node’s memory can be used by one user. Any process which exceeds this limit will be killed by the system.
Password#
All DKRZ systems are managed by a central directory service (LDAP). The password can be changed through the user and project portal. A user defined password must contain at least eight nonblank characters and has to be a combination of upper and lowercase letters, numbers and special characters. Additional checks are made to ensure that the password is not in a dictionary and not overly simple. The online service will give you detailed error messages if and why a new password was rejected.
In case you do not remember your password please request a password reset.
Public Key Authentication#
The default password authentication is neither comfortable nor very secure. In order to use public key authentication, you have to generate a key pair and upload the public key to DKRZ. The command for key generation is ssh-keygen. It supports different key types. We recommend ed25519 keys.
ssh-keygen -t ed25519
Please use a strong passphrase to secure your key. By default, this
created two files named id_ed25519 and id_ed25519.pub.
ls ~/.ssh/
id_ed25519     id_ed25519.pub
The file ending with .pub has to be uploaded to
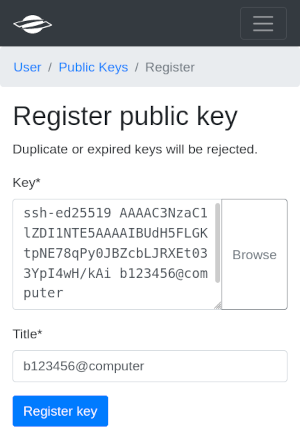
https://luv.dkrz.de/pubkeys. First press “Add key”

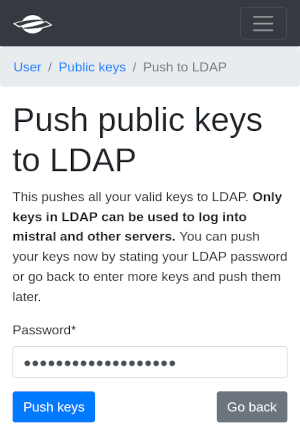
The public key can be selected from a file by pressing the “Browse” button or pasted directly into the Key input field. Do not select UFTP unless you want to use this key for UFTP exclusively. After pressing “Register key”, the key is uploaded to the server. In order to use it on Levante, you have to provide your LDAP password.

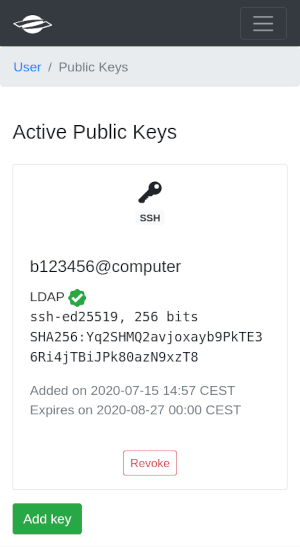
After that your key should be active and ready to use.

Key validity#
For most key types, the validity or lifetime of the keys is six weeks. A longer lifetime is allowed for keys using hardware tokes (see below). You should receive an e-mail one day before the key expires. You then have to upload a newly created key to continue using public key authentication. The old key is blocked from further use at DKRZ and cannot be uploaded again.
Managing Multiple SSH Keys#
You may require multiple SSH keys for different computer centers. Reasons for this are added security and the fact that policies for key properties and lifetime may differ from site to site.
To prevent your SSH client from trying out all available keys, you
should tell it exactly where to use which key. For this purpose you
can create or edit your local configuration file ~/.ssh/config.
Host *.dkrz.de
     IdentityFile ~/.ssh/id_ed25519
     IdentitiesOnly yes
This tells ssh to use only the key ~/.ssh/id_ed25519 to log into
any host at DKRZ.
Increased security and key lifetime with hardware authenticators#

OpenSSH starting with version 8.2 supports FIDO/U2F hardware authenticators or tokens. The use of such tokens increases the security of your ssh-key, as not only the key file (and passphrase) is needed for auth, but you need to touch the token when logging into a system. Because of the increased security, we allow a lifetime of 365 days for SSH keys which work in conjunction with such a token. There are two major requirements for the use of this technology:
A recent OpenSSH version, i.e. OpenSSH 8.2 or more recent.
A token.
We recommend you to ask your IT department for obtaining one. We recommend FIDO certified tokens, following the U2F or FIDO2 specification, with FIDO2 being more future-proof. At DKRZ, Yubicos YubiKey tokens have proven convenient. The cheaper Yubico “Security Key” model does the job.
Once you have the recent SSH client and a token, you need to create a new ssh-key of type ed25519-sk by running
ssh-keygen -t ed25519-sk
You can upload the public key to https://luv.dkrz.de/pubkeys following the instructions provided above for classic keys. Do not select UFTP. You should notice the extended lifetime when you upload the public key. For authentication with Levante, the token has to communicate with your local device (via USB, NFC, etc.) and you have to touch it to confirm your presence.
Tips#
Having two keys, one at your desk, one on your keychain/… has proven convenient. Each token needs a separate SSH key.
OSX: The openssh which comes along with MacPorts (here version 8.4, as of 30 Aug 2021) does not support fido2. A ssh (8.7p1) installed via brew does work.
Default login shell#
The default login shell for new DKRZ users is bash. You can
change your login shell to tcsh, zsh etc. using the
user and project portal. The settings you
would like to use every time you log in can be put into special shell setup
files. A login bash shell looks for .bash_profile, .bash_login or
.profile in your home directory and executes commands from the first file
found. A non-login bash shell or bash subshell reads .bashrc file. Tcsh
always reads and executes .tcshrc file (or .cshrc if .tcshrc is not
found). If tcsh is invoked as login shell, file .login is sourced
additionally. The typical tasks and setting that can be put in shell setup
files are for example:
Creation of a custom prompt
Modification of search path for external commands and programs
Definition of environment variables needed by programs or scripts
Definition of aliases
Execution of commands (e.g.
module load <modname>/<version>)
Primary group#
Your primary Unix group will be set to the first project your account is member of. This will not be modified until the project expires. Even if you join other projects, the primary group will stay the same. If you wish to have a different primary group (e.g. you are working most of the time for a different project), you will have to contact DKRZ user support, there is no option to change the primary group on your own.
Module environment#
To cover the software needs of DKRZ users and to maintain different
software versions, the DKRZ uses the module environment. Loading a module adapts your
environment variables to give you access to a specific set of software
and its dependencies. The modulefiles are not organized hierarchically but
have internal consistency checks for dependencies and can uniquely be
identified by naming convention <modname>/<version>.
Each modulefile is named following the below pattern
pkg.name/pkg.version-^mpi.name-^mpi.version-compiler.name-compiler.version
i.e. the package name is followed by the version of the package, then, if it applies, the MPI implementation (name and version), and the compiler (name and version) used to build the package, for example:
intel-oneapi-compilers/2022.0.1-gcc-11.2.0
openmpi/4.1.2-intel-2021.5.0
netcdf-c/4.8.1-openmpi-4.1.2-intel-2021.5.0
Such long module file names are needed to avoid naming conflicts and to support users in the selection of compatible software variants.
Note
If only the <modname> (i.e. without <version>) is supplied
to the module command, the lexicographically highest version or
one marked as default explicitly is loaded. In most cases this will
result in incompatible software combinations. It is important to
ensure that you use modules for required libraries built with the
same compiler and MPI that you chose to build your program.
In many cases it is unproblematic to use newer compiler and MPI versions for your program than those used to build libraries in the software tree, if those are compatible.
Users can load, unload and query modules through the module
command. The most important module sub-commands are:
module avail: Shows the list of all available modulesmodule show <modulefile>: Shows the effect of loading the module <modulefile> on your environment. For a deeper insight into the software dependencies, please use the spack command as described below.module load <modulefile>: Loads selected module; a default or lexicographically highest version is chosen, if only <modname> without <version> is specifiedmodule list: Lists all modules currently loadedmodule rm <modulefile>: Unloads module <modname>/<version>module swap <modulefile1> <modulefile2>: Switches loaded module <modulefile1> to <modulefile2> (mainly used to switch to a different version of software)module purge: Unloads all modulesmodule apropos <keyword>: Scans the available module files for the specified keyword and list all matching modules
For further details, please refer to the manual pages for the module
command or use --help option:
$ man module
$ module --help
To use the module command in a script you have to source one of the following files before any invocation of the module command:
# in bash or ksh script
source /sw/etc/profile.levante

# in tcsh or csh script
source /sw/etc/csh.levante
The module avail command provides up-to-date information on
installed software packages for which environment modules were
generated.
Searching and accessing the software tree with spack#
Apart from the module
command there is a
command called spack for further investigation of the installed
software. In fact it is the package manager which is used by DKRZ to
build and maintain the software tree. You can find more documentation
at https://spack.readthedocs.io.
A proper replacement for module avail is spack find, which
represents the most basic information: package name and version as
well as compiler used to buid the package. To list all software
packages installed on Levante, use:
$ spack find
Let’s use the netcdf-c package to compare module and spack
commands:
$ module avail netcdf-c
---------------------------------- /sw/spack-levante/spack/modules -----------------------------------
netcdf-c/4.8.1-gcc-11.2.0                                netcdf-c/4.8.1-openmpi-4.1.2-gcc-11.2.0
netcdf-c/4.8.1-intel-2021.5.0                            netcdf-c/4.8.1-openmpi-4.1.2-intel-2021.5.0
netcdf-c/4.8.1-intel-oneapi-mpi-2021.5.0-gcc-11.2.0
netcdf-c/4.8.1-intel-oneapi-mpi-2021.5.0-intel-2021.5.0
$ spack find netcdf-c
==> 6 installed packages
-- linux-rhel8-zen2 / intel@2021.5.0 ----------------------------
netcdf-c@4.8.1  netcdf-c@4.8.1  netcdf-c@4.8.1

-- linux-rhel8-zen3 / gcc@11.2.0 --------------------------------
netcdf-c@4.8.1  netcdf-c@4.8.1  netcdf-c@4.8.1
netcdf-c has a lot of dependencies and can be built in different
ways (serial, parallel, w/o netcdf4, w/o thread safety). module on
the other hand does not provide much information on this. In the case
of netcdf-c it is possible to inspect the installation with the
nc-config tool, but not many package provide such a tool.
First let’s try to seperate the available netcdf-c package from each
other. Here the -l option of spack find is useful:
$ spack find -l netcdf-c
==> 6 installed packages
-- linux-rhel8-zen2 / intel@2021.5.0 ----------------------------
f7hh57c netcdf-c@4.8.1  2k3cmu3 netcdf-c@4.8.1  7dq6g2h netcdf-c@4.8.1

-- linux-rhel8-zen3 / gcc@11.2.0 --------------------------------
qk24ypm netcdf-c@4.8.1  6qheqru netcdf-c@4.8.1  xguss5s netcdf-c@4.8.1
Each installed package has a unique alphanumeric string (hash),
which can be used to identify this package. The first six characters
of the hash are used as part of the installation path. Let’s inspect
the first package in the list (f7hh57c). The flags -p and
-d will print the path and dependency information:
$ spack find -dp /f7hh57c
==> 1 installed package
-- linux-rhel8-zen2 / intel@2021.5.0 ----------------------------
netcdf-c@4.8.1                  /sw/spack-levante/netcdf-c-4.8.1-f7hh57
    curl@7.61.1                 /usr
    hdf@4.2.15                  /sw/spack-levante/hdf-4.2.15-jvpsue
        libaec@1.0.5            /sw/spack-levante/libaec-1.0.5-gij7yv
        libjpeg-turbo@1.5.3     /usr
        libtirpc@1.2.6          /sw/spack-levante/libtirpc-1.2.6-7laks4
            krb5@1.19.2         /sw/spack-levante/krb5-1.19.2-rteqqi
                openssl@1.1.1g  /usr
        zlib@1.2.11             /usr
    hdf5@1.12.1                 /sw/spack-levante/hdf5-1.12.1-4l5deg
        pkg-config@1.4.2        /usr
In this view you can see each individual runtime dependency and where
it is located. This is far more than the module command can do.
Obviously this is a serial version of netcdf-c without support for
parallel I/O useful for tools like CDO. Please note that the spack
hash must be prepended with a slash (/) so that spack can handle
it as special input instead of a normal package name.
Let’s check the next one in the list:
$ spack find -dp /2k3cmu3
==> 1 installed package
-- linux-rhel8-zen2 / intel@2021.5.0 ----------------------------
netcdf-c@4.8.1                         /sw/spack-levante/netcdf-c-4.8.1-2k3cmu
    curl@7.61.1                        /usr
    hdf@4.2.15                         /sw/spack-levante/hdf-4.2.15-jvpsue
        libaec@1.0.5                   /sw/spack-levante/libaec-1.0.5-gij7yv
        libjpeg-turbo@1.5.3            /usr
        libtirpc@1.2.6                 /sw/spack-levante/libtirpc-1.2.6-7laks4
            krb5@1.19.2                /sw/spack-levante/krb5-1.19.2-rteqqi
                openssl@1.1.1g         /usr
        zlib@1.2.11                    /usr
    hdf5@1.12.1                        /sw/spack-levante/hdf5-1.12.1-tvymb5
        numactl@2.0.14                 /sw/spack-levante/numactl-2.0.14-6yawk5
        openmpi@4.1.2                  /sw/spack-levante/openmpi-4.1.2-yfwe6t
            knem@1.1.4.90mlnx1         /opt/knem-1.1.4.90mlnx1
            libevent@2.1.8             /sw/spack-levante/libevent-2.1.8-mjzu6s
            openssh@8.0p1              /usr
            pmix@3.2.1                 /sw/spack-levante/pmix-3.2.1-xut2g3
                hwloc@2.6.0            /sw/spack-levante/hwloc-2.6.0-43fbvn
                    libpciaccess@0.16  /sw/spack-levante/libpciaccess-0.16-knievr
                    libxml2@2.9.7      /usr
                    ncurses@6.2        /sw/spack-levante/ncurses-6.2-qam5nn
            slurm@20.11.7              /usr
            ucx@1.12.0                 /sw/spack-levante/ucx-1.12.0-nlas56
                rdma-core@35.0         /usr
        pkg-config@1.4.2               /usr
    parallel-netcdf@1.12.2             /sw/spack-levante/parallel-netcdf-1.12.2-mc24h4
This installation of netcdf is parallel and supports hdf4 and hdf5 with szip compression. This installation is useful for a climate or NWP model if you want to build it using the Intel compiler and the Open MPI library.
These differences in building a package are called variants and can
printed with the -v option:
$ spack find -lv /2k3cmu3
==> 1 installed package
-- linux-rhel8-zen2 / intel@2021.5.0 ----------------------------
2k3cmu3 netcdf-c@4.8.1+dap~fsync+hdf4~jna+mpi+parallel-netcdf+pic+shared
Instead of using hash 2k3cmu3 it is possible to identify a package
by its name, version (@), compiler (%), variant
(+, -, ~), and dependencies (^), for example:
$ spack find -p netcdf-c@4.8.1 +mpi +parallel-netcdf +shared %intel@2021.5.0
==> 2 installed packages
-- linux-rhel8-zen2 / intel@2021.5.0 ----------------------------
netcdf-c@4.8.1  /sw/spack-levante/netcdf-c-4.8.1-2k3cmu
netcdf-c@4.8.1  /sw/spack-levante/netcdf-c-4.8.1-7dq6g2

$ spack find -p netcdf-c +mpi %intel@2021.5.0 ^openmpi
==> 1 installed package
-- linux-rhel8-zen2 / intel@2021.5.0 ----------------------------
netcdf-c@4.8.1  /sw/spack-levante/netcdf-c-4.8.1-2k3cmu
In case you are only interested in the installation prefix of a given
package, you can use spack find --format='{prefix}'
$ spack find --format='{prefix}' /2k3cmu3
/sw/spack-levante/netcdf-c-4.8.1-2k3cmu
Note, that modulefiles are not generated for every installed software
package on Levante. The easiest way to add a package (without an
existing modulefile) to the user environment is to use the spack
load command, for example:
$ spack find bison
==> 2 installed packages
-- linux-rhel8-zen2 / intel@2021.5.0 ----------------------------
bison@3.8.2
-- linux-rhel8-zen3 / gcc@11.2.0 --------------------------------
bison@3.8.2
$ spack load bison%gcc
$ which bison
/sw/spack-levante/bison-3.8.2-pqp4nq/bin/bison
$ spack load xterm
$ which xterm
/sw/spack-levante/xterm-353-aejrct/bin/xterm
To remove packages from the user environment, the spack unload command
can be used:
$ spack unload bison xterm
Loading software packages with the spack load command modifies a
number of environment variables, such as PATH,
LD_LIBRARY_PATH, MANPATH, PKG_CONFIG_PATH etc. To see
changes that will be introduced into your environment by loading a
software package with spack, you can use the -sh option:
spack load --sh bison%gcc
To list packages loaded into your environment with spack load, you
can use
spack find --loaded
Please have a look into the official documentation of spack for further information.