Kernels#
Kernels are programming language specific processes that run independently and interact with the Jupyter Applications and their user interfaces [1].
On this page, you will learn how to use default kernels and how to enable your custom environments–for example using conda/mamba or virtualenv.
For any issue or request, contact support@dkrz.de
System-wide kernels#
Note
Most kernels and modules are based on Conda environments. After activating an environment, you can use conda/mamba list to view all installed packages and their versions.
On Levante, we povide the following kernels:
0 Python 3 based on the module python3/unstable (see details here)
1 Python 3 based on the module python3/2023.01-gcc-11.2.0`
Widely used open-source packages are already installed
We will/might add more when corresponding modules are available
R 4.1.2 (based on the module r/4.1.2)
R 4.2.2 (based on the module r/4.2.2)
Julia (based on the module julia/1.7.0) –> see this blog post for more details
ESMValTool (based on the latest module esmvaltool)
Bash (execute bash commands in jupyter cells)
ML (based on the latest module
pytorch)
More information on Python modules can be found here
Note
You cannot install or update packages in the system-wide modules.
Additionally, we do not recommend using the --user flag to install packages in your $HOME directory, as it may not work reliably.
Note
To test new libraries or packages, we recommend creating your own Conda or virtual environment, as described below, and configuring it as a Jupyter kernel.
Wrapper packages#
Some Python libraries or kernels act as wrappers around external software binaries—for example, (py) CDO. In such cases, the corresponding binary must be loaded before using the Python wrapper. If not, you may encounter errors such as:
Module ‘xyz’ not found.
In the default Python 3 kernel, several commonly used binaries are preloaded, including CDO, SLK, and git.
For other wrappers, you can load additional modules or define environment variables by creating a file named .kernel_env in your home directory. This file is automatically sourced each time you start the default Python 3 kernel.
For instance, pynco requires the module netCDF Operator (NCO). You can load by adding this line to the .kernel_env file:
module load nco
Use your own kernel#
To get full control of the Python interpreter and packages, we recommend that you create your own environment. Please, follow these steps:
To have full control over the Python interpreter and installed packages, we recommend creating your own environment. Please follow the steps below:
With conda/mamba
% module load python3
% conda create -n env-name -c conda-forge ipykernel python=3.x
% source activate env-name
% python -m ipykernel install --user --name my-kernel --display-name="My Kernel"
% conda deactivate
With virtualenv
If virtualenv is not available, you have to install it first before trying the following steps. The best way to install virtualenv is with pip:
% module load python3
% python -m venv --system-site-packages /path/to/new-kernel
% source /path/to/new-kernel/bin/activate
% pip install ipykernel
% python -m ipykernel install --user --name my-kernel --display-name="New Kernel"
You can now add/install additional packages that you need in your new environment and then:
(new-kernel) % deactivate
Finally:
(Re)start the server (jupyter notebook)
Refresh the browser (jupyterlab)
Now, the new kernel should be available.
Kernel specifications are in ~/.local/share/jupyter/kernels/.
More details on kernels can be found here.
With the Conda env manager extension
Click the Conda Environments icon in the left sidebar to open the environment manager panel.
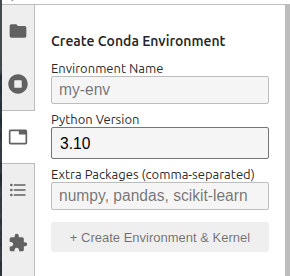
You need to specify:
Environment Name — Enter a unique name (e.g. my-analysis)
Python Version — Select a Python version (3.9–3.12)
Optionally comma-separated Extra Packages (e.g. numpy, pandas, scikit-learn)
Click + Create Environment & Kernel
The extension will automatically:
Create a new conda environment using mamba
Install ipykernel
Register the environment as a Jupyter kernel
Environment creation typically takes 1–2 minutes, depending on the number of packages.
Once the environment has been created, the kernel becomes immediately available.
Advanced#
You can further customize your new kernel by modifying the kernel.json file. Its contents typically look like this:”
{
 "argv": [
     "/home/user/kernels/new-kernel/bin/python",
     "-m",
     "ipykernel_launcher",
     "-f",
     "{connection_file}"
 ],
 "display_name": "new-kernel",
 "language": "python"
}
It is possible to specify additional environment variables:
{
 "argv": [
     "/home/user/kernels/new-kernel/bin/python",
     "-m",
     "ipykernel_launcher",
     "-f",
     "{connection_file}"
 ],
 "display_name": "new-kernel",
 "language": "python",
 "env": {
     "variable": "value",
 }
}
Best practices#
Where to install the new environment?
Conda environments usually contain a huge number of small files,
therefore we recommend creating them on the low‑latency VAST /home
file system. Creating Python environments on the Lustre /work file
system is strongly discouraged. If possible, please migrate any
existing Python environments back to /home to take advantage of
the VAST file system and reduce the number of small files on the
Lustre file system. Doing so will make environment creation and
activation faster, accelerate program start-up and Python import
commands.
For more information see our Python documentation.
Helper script for kernel.json
You can create a shell script named start-kernel.sh and make it executable using chmod +x start-kernel.sh.
This script can include all the configurations you want to apply when launching your new kernel.
For example, you might use it to load necessary system modules. The structure of the script could look like this:
#!/bin/bash

source /etc/profile
module purge

module load netcdf_c/4.3.2-gcc48
module load python/3.5.2
python -m ipykernel_launcher -f "$1"
And the kernel.json:
{
 "argv": [
     "start-kernel.sh",
     "{connection_file}"
 ],
 "display_name": "new-kernel",
 "language": "python"
}
uninstall/remove a kernel
jupyter kernelspec remove kernel-namedelete the corresponding conda/virtual environment if you don’t need it anymore
Troubleshooting#
CommandNotFoundError#
This happens when you to try to activate a conda environment but conda is not (yet) in the path. There are two solutions for this issue:
use source activate instead of conda activate
type this before using conda:
. `dirname $(which conda)`/../etc/profile.d/conda.sh