Plugins#
![]()
![]()
This functionality is the access point to all installed analysis tools. This tools are developed by the researches community and added (or “plugged”) into the Freva framework, open for everyone within the project to be used.
This command allows not only the call of the plugins, but also to show and store a specific parameter configuration for later re-use or re-adaptation, information about the repository version or even different possibilities to run them.
See also
- Plugins for Freva
List of the plugin repositories currently connected (or in dev) to ClimXtreme and RegIKlim. The plugins are developed using the Git repository system.
Be aware that their access may be limited to specific projects, and hence, the below shown examples may not be possible to reproduce/consult by everyone.
Help#
$ freva --plugin --help
Applies some analysis to the given data.
See https://code.zmaw.de/projects/miklip-d-integration/wiki/Analyze for more information.

The "query" part is a key=value list used for configuring the tool. It\'s tool dependent so check that tool help.

For Example:
    freva --plugin pca eofs=4 bias=False input=myfile.nc outputdir=/tmp/test

Usage: freva --plugin [options]

Options:
  -d, --debug         turn on debugging info and show stack trace on
                      exceptions.
  -h, --help          show this help message and exit
  --repos-version     show the version number from the repository
  --caption=CAPTION   sets a caption for the results
  --save              saves the configuration locally for this user.
  --save-config=FILE  saves the configuration at the given file path
  --show-config       shows the resulting configuration (implies dry-run).
  --scheduled-id=ID   Runs a scheduled job from database
  --dry-run           dry-run, perform no computation. This is used for
                      viewing and handling the configuration.
  --batchmode=BOOL    creates a SLURM job
Usage in CLI#
1. Basic Usage#
Simply type freva --plugin to list all available analysis tools in the corresponding Freva instance:
$ freva --plugin
Blocking_2D: Calculates various 2D-Blocking Indices of the Northern Hemisphere
ClimDexCalc: Calculates the ETCCDI climate extreme indices on the basis of daily temperature and precipitation data using the ClimDex software provided by
            PCIC.
CWT: Calculate Circulation Weather Type by mean sea level pressure.
DiffPlotter: Plots difference between two NetCDF files
MoviePlotter: Plots 2D lon/lat movies in GIF format
MurCSS: Calculates the MSESS, Correlation, ConditionalBias, and the CRPSS like Goddard et al. (2013)
PCA: Principal Component Analysis
PERCENTILE: Calculates multiple percentiles using CDO
PreProc: Spatio-temporal Pre-Processing of Data, Converting to CMORized formats and Linking processed data to your database.
ProblEMS: PROBabiListic Ensemble verification for MiKlip using SpecsVerification.
PSI: Precipitation Severity Index over a selected geographical area & time period
...
Note
Be aware that the list of available plugins is totally dependant on the project and, hence, it might vary from one Freva instance to another.
To see the description of a particular tool type --help or -h:
$ freva --plugin pca --help
PCA (v3.1.0):
    Principle Component Analysis (by C.Blume and INTEGRATION)
    A tool that does multiple eofs, incl. eigenvectors, eigenvalues and principle
    components. It has the ability to weight the area, make a bootstrap error estimate
    and a reprojection to a physical field. The output is a netCDF file and some basic
    plots helping to combine the informations of the principle component analysis

Options:
session      (default: 1)
             This defines two possible sessions:
                     1 means the program performs a PCA computing a maximum
             number of EOFs given by EOFS.
                     2 means a PCA has been already performed and a back-
             transformation is computed retaining a certain number of EOFs given
             by EOFS.
eofs         (default: 10)
             Number of EOFs that are computed by the PCA (SESSION=1) or that are
             included in the back-transformation (SESSION=2). If<=0 the largest
             possible value will be used.
input        (default: <undefined>) [mandatory]
             An arbitrary NetCDF file. There are only two restrictions to your
             NetCDF file: a) Time has to be the very first dimension in the
             variable you like to analyze. b) All dimensions in your variable
             need to be defined as variables themselves with equal names. Both,
             a) and b), are usually true.

...
It will display the basic information of each paremeter, including:
its default value (
Nonemeans there is no value setup).whether the configuration is mandatory (
[mandatory]marking by the default value).and an explanation about the configuration parameter.
To pass the values to the tool you just need to use the key=value
construct like this:
$ freva --plugin pca input=myfile.nc outputdir=/tmp eofs=3
[...]
The variables can be defined in terms of other variables. For that you
need to escape the $ sign by using the backslash (\) or set
the value in single quotes (no, double quotes do not work):
$ freva --plugin pca input=myfile_\${eofs}.nc outputdir=/tmp eofs=3

or

$ freva --plugin pca 'input=myfile_${eofs}.nc' outputdir=/tmp eofs=3
Note
There is abundant material about special character out there, like this or this if you want to know even more.
Please, be aware that quoting is very important on any shell, so if you use them, be sure to know how it works.
Warning
Be aware that a simple tool call in Freva:
$ freva --plugin pca
ERROR:  Error found when parsing parameters. Missing mandatory parameters: input, variable
Will complain because of an incomplete configuration call.
2. Showing & Saving the configuration#
To see the parameter configuration of the plugin you are about to run in a compact way you can use the flag --show-config. The configuration will be shown in a clean two column display, facilitating the debugging. This flag implies a dry-run of the tool, stoping it before it executes.
$ freva --plugin psi latlon='47,52,4,9' cmor_table='day' product='reanalysis' dryrun='False' area_weight='cos' percentile_threshold='True' institute='ecmwf' cache='/work/bmx825/miklip-work/k204229/evaluation_system/cache/psi' sel_extr='10,5,3' outputdir='/work/bmx825/miklip-work/k204229/evaluation_system/output/psi/20211010_214150' project='reanalysis' time_frequency='day' experiment='era5' threshold='99' seldate='1981-01-01,2021-08-01' variable='pr' model='ifs' cacheclear='True' ensemble='r1i1p1' persistence='3' --show-config
            inputdir: -
             project: reanalysis
             product: reanalysis
           institute: ecmwf
               model: ifs
          experiment: era5
      time_frequency: day
            variable: pr
            ensemble: r1i1p1
          cmor_table: day
           outputdir: /work/bmx825/miklip-work/k204229/evaluation_system/output/psi/20211010_214150
               cache: /work/bmx825/miklip-work/k204229/evaluation_system/cache/psi
          cacheclear: True
             seldate: 1981-01-01,2021-08-01
              latlon: 47,52,4,9
         area_weight: cos
percentile_threshold: True
           threshold: 99
         persistence: 3
            sel_extr: 10,5,3
              dryrun: False
All configurations that are saved in the –history can be seen, saved, return into a command and restarted.
If you want to save the configuration of the tool type --save-config=path_to/tool.conf :
$ freva --plugin pca --save-config=/home/<user_account>/evaluation_system/config/pca/pca.conf variable=tas input=myfile.nc outputdir=/tmp eofs=3
Configuration file saved in /home/<user_account>/evaluation_system/config/pca/pca.conf
Or simply type --save. This flag stores the configuration in a special directory
structure so the system can find it again.
$ freva --plugin pca --save --dry-run variable=tas input=myfile.nc outputdir=/tmp eofs=3
Configuration file saved in /work/bmx825/miklip-work/<username>/evaluation_system/config/pca/pca.conf
Note
While saving the configuration you will not be able to start the
tool. For that you will need to take the --save flag out again.
3. Scheduling#
A tool call, by default, involves the interactive mode (that is --batchmode=false). For example, to run the murcss tool:
$ freva --plugin murcss variable=tas ...
The execution takes a certain time (here: roughly 1 minute) and prints
Searching Files
Remapping Files
Calculating ensemble mean
Calculating crossvalidated mean
Calculating Anomalies
Analyzing year 2 to 9
Analyzing year 1 to 1
Analyzing year 2 to 5
Analyzing year 6 to 9
Finished.
Calculation took 63.4807469845 seconds
But it could take much longer, and block the login shell for using it for something else. For that we need to use the workloader.
To schedule the same task we need to use --batchmode=true:
$ freva --plugin murcss variable=tas ... --batchmode=true
   Scheduled job with history id 414
You can view the job's status with the command squeue
Your job's progress will be shown with the command
tail -f  path_to/evaluation_system/slurm/murcss/slurm-1437.out
The status of the job can be consulted with the command that appears in the last line.
For jobs with a long run-time or large amounts of jobs, consider to schedule them and use the batch mode.
4. Simplest workflow example#
Let’s assume that we want to compute a Principal Component Analysis over a series of ensemble members for a certain year (1960), for surface temperature (tas). We can use the PCA plugin and iterate it
over all ensemble members of the experiment started in 1960 and compute the PCA of them for that variable. In bash this would be:
#!/bin/bash
for file in $(freva --databrowser project=baseline1 variable=tas time_frequency=mon experiment=*1960); do
  freva --plugin pca input=$file outputdir=/tmp variable=tas pcafile=pca_$(basename $file)
done
Usage in web#
1. Overview of the Plugin Menu#
The usage through web is more intuitive but less flexible as via CLI. For example, as found in ClimXtreme:
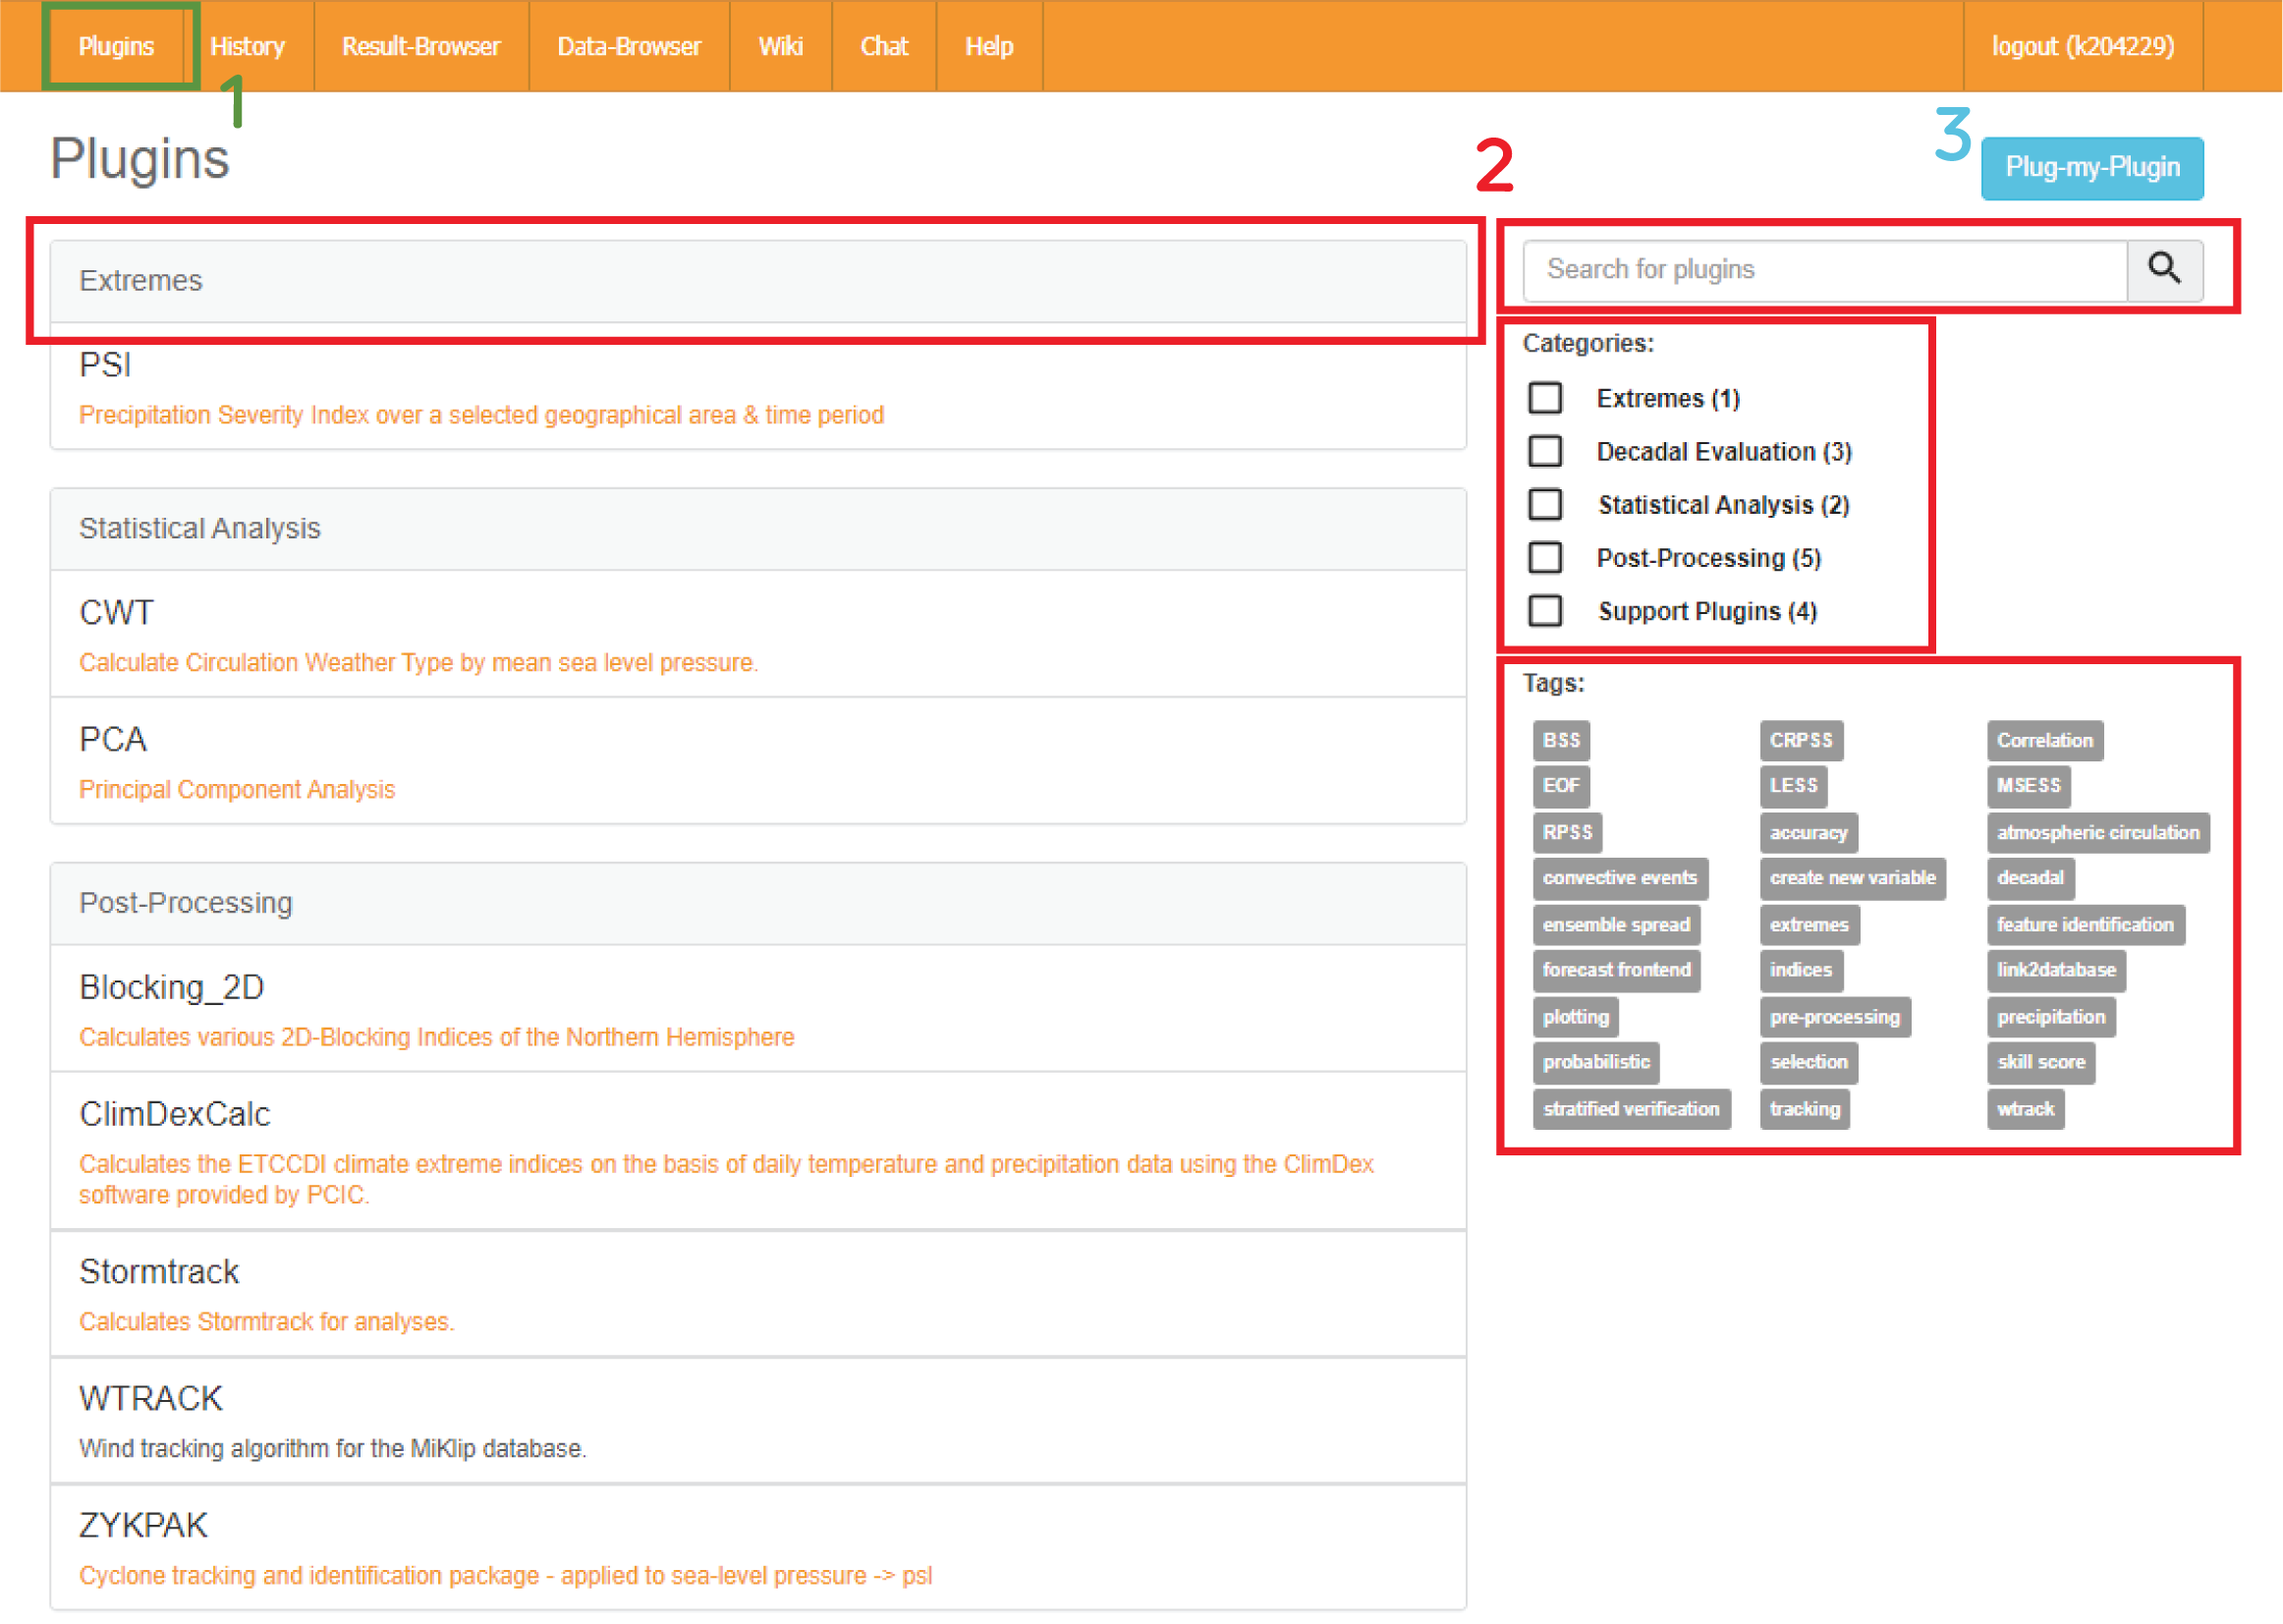
The
Plugin Menuis accessed clicking its corresponding tab (box 1). In this menu we can see the central repository of the available plugins.The plugins are sorted out in different categories and tags (2). We can narrow down the search either clicking in their corresponding boxes or typing in.
The
Plug-my-Pluginbutton (3) allows the user to plug the plugins hosted at its own workspace, for example to test plugins that are in development (even versions of those currently provided within):
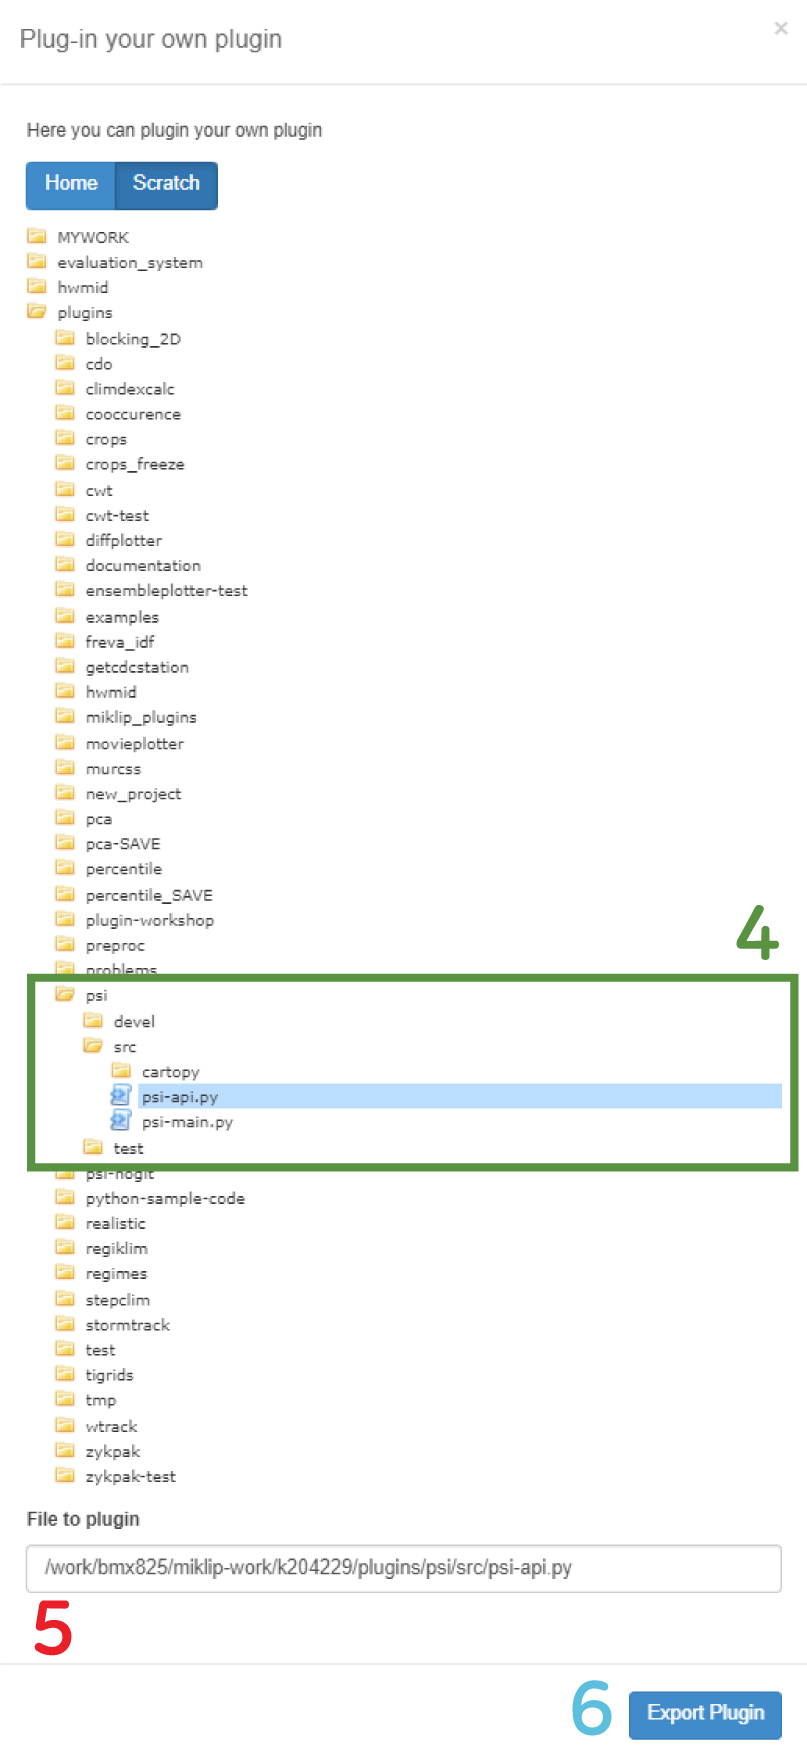
Clicking it the user’s workspace will be displayed. Each plugin (4) has a wrapper python file that connects to Freva’s API (5).
Once is loaded (
Export Plugin, 6) the plugin will be accessible by the user as it will appear in its menu. This functionality allows the user not only to test new plugins, but also develop versions or currently existing ones, as they will be temporaly overwritten. A red message over the plugged plugin will indicate its new status.To unplug the plugin (only one plugin can be plugged at a time), just click 3.
2. Running a Plugin#
Once a Plugin is selected (example of a run with a plugin that calculates the Precipitation Severity Index of an particular region), we will land on its setup page, which will show its configuration options, similar to the CLI (here only a part of it is shown):

After the setup is run (Run button, it will send the job to the SLURM workloader). We will land on its results page:
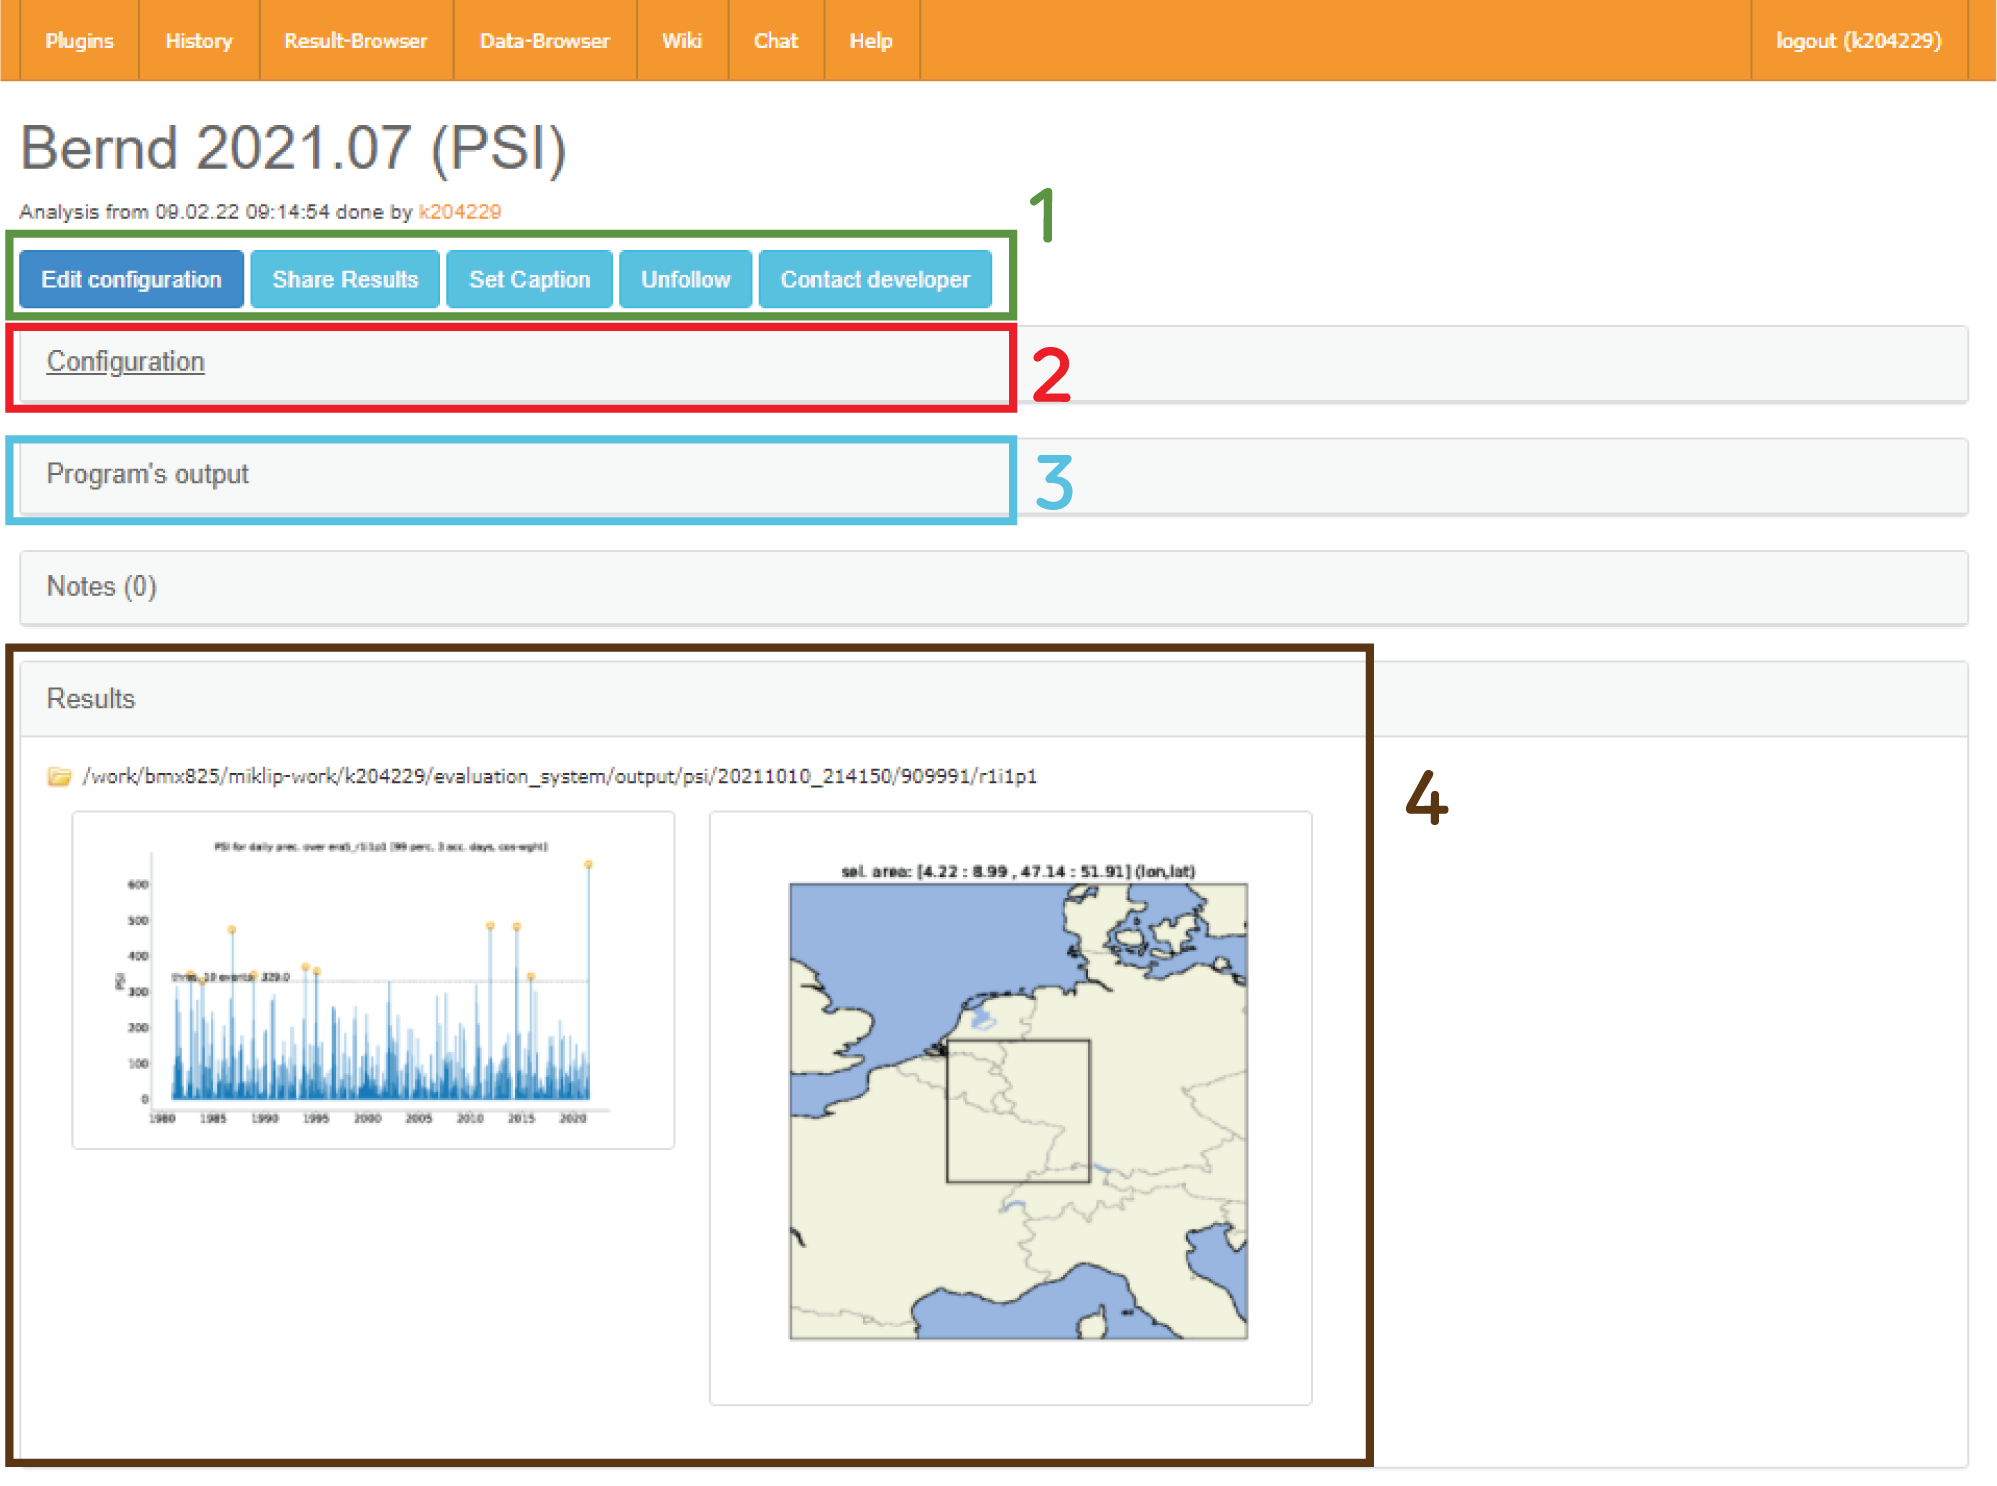
The upper buttons (1) offer the possibility to:
edit the configuration of the actual run (landing on the above mentioned setup page) to for example modify it and run it again.
share the current with another member of the project via internal email.
set a caption if it was not set it up before, e.g. “Bernd 2021.017 (PSI)”.
contact the developer for questions or informations about bugs.
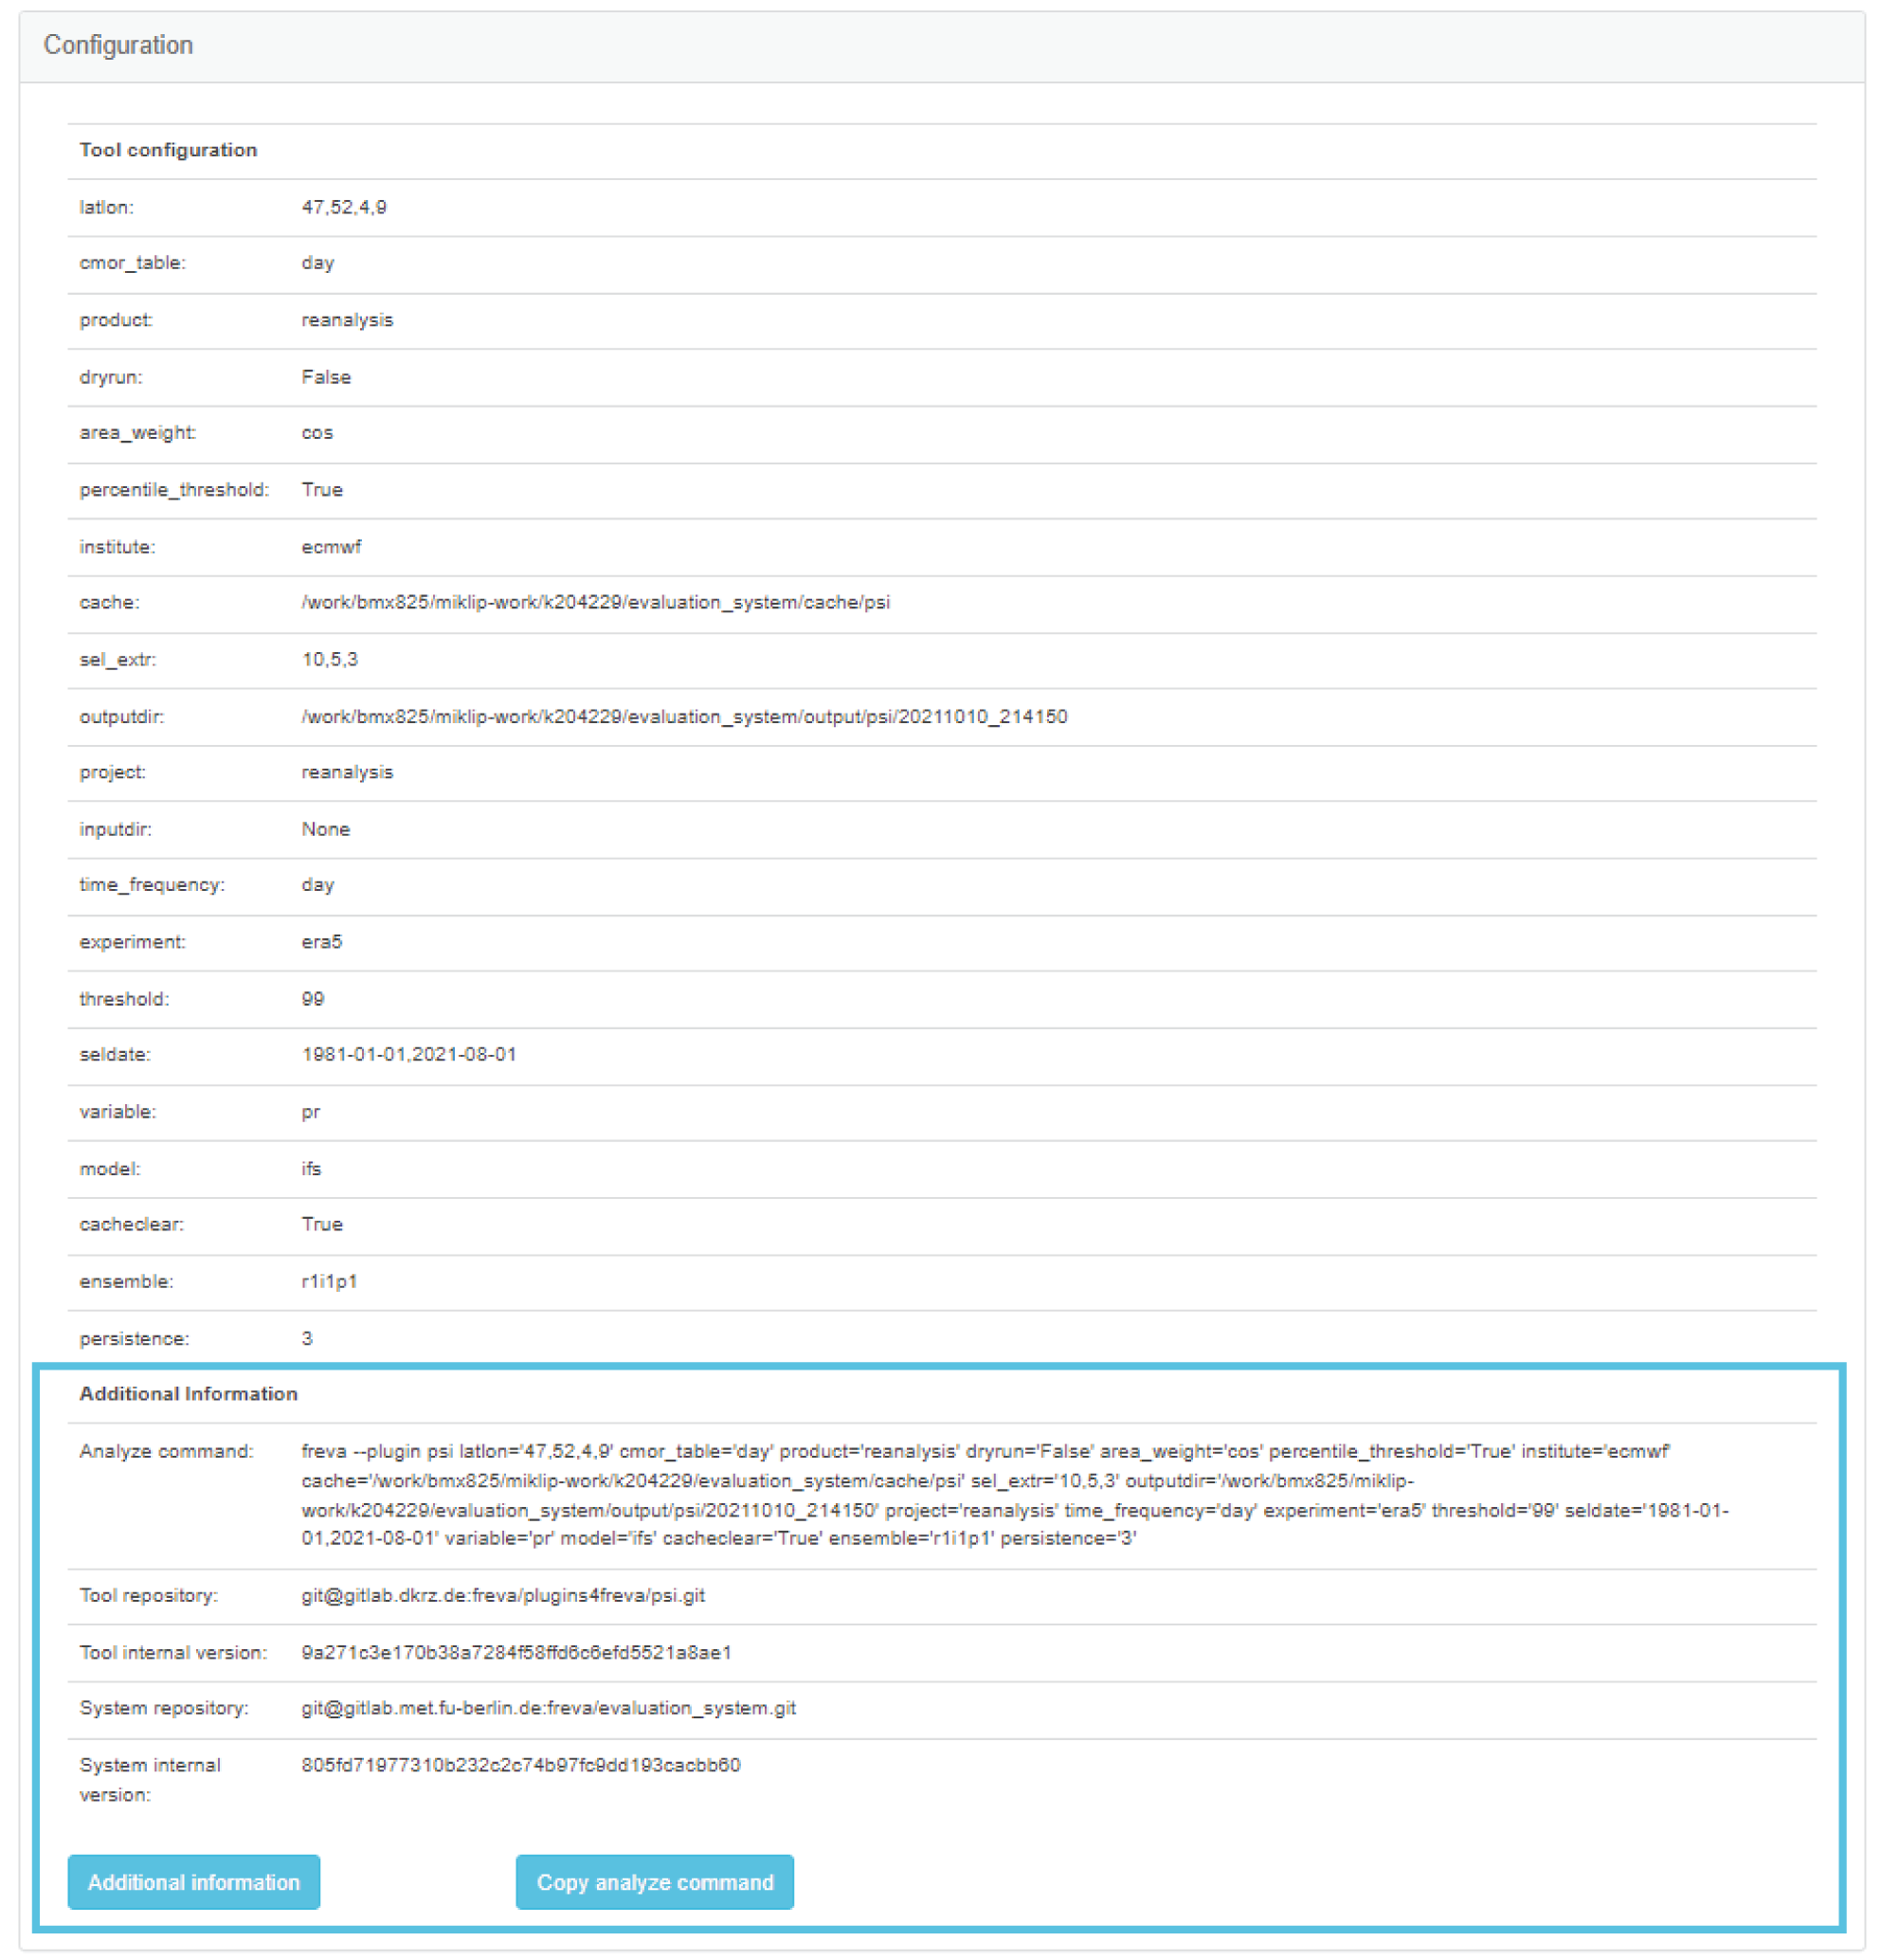
The configuration section will display the specific configuration of the actual run (2), with its CLI equivalent, and even GIT version of the tool and Freva instance:
The
Program's outputsection (3) will display the SLURM output message mentioned in the Scheduling Section.The
Resultssection (4) will display the plots or animations produced by the plugin (if any). The files will not be shown here.